Assembling RTA Cabinets: Tools and Order of Work
A flat-packed cabinet goes together in one reliable order: box square first, glides and drawers next, doors last. CasaBuilt ships that flat-pack in 3-10 business days with the hardware bagged and a step-by-step guide in the carton, and its published box is 1/2-inch birch plywood. Most first-build problems come from working in the wrong order rather than from a missing tool.
Key takeaways
- Build the box on a flat floor and check it for square before any hardware goes on.
- Carcass: 1/2-inch birch plywood, with a 3/4-inch by 1-1/2-inch solid birch face frame.
- Hang doors after the cabinet is fixed and level, not while it is still lying down.
- The carton carries every part and a step-by-step guide; dispatch is 3-10 business days.
Square first, then everything else
A cabinet is a box before it is a piece of furniture. If the box is twisted, every part fitted to it inherits the twist: a drawer front sits proud at one corner, a door rubs along the top edge, a shelf no longer rests on all four supports. Assembly therefore starts on the floor, and it starts with the largest panels rather than with the hinges.
Work on a surface that is genuinely flat. The cardboard the cartons arrived in makes a reasonable mat and saves the finished faces from grit. Join the box loosely, then measure both diagonals of the opening; if the two measurements differ, the carcass is racked rather than square. Easing the fasteners, pressing the long side down and re-measuring is usually enough to bring it back. Tighten only once the diagonals agree.
Hardware comes after that check, never before. Glides, hinges and shelf supports all reference the box, so fitting them to a racked carcass locks the error in. This is the habit that separates a cabinet that closes cleanly from one that needs a new hole drilled beside the old one.
What is already finished when the carton opens
The flat-pack is not a pile of raw lumber. Panels arrive cut to the cabinet's published sizes with the finish already applied: seven layers of paint with a UV protective topcoat on the exposed faces, and natural birch inside the box. The sides are color-matched to the door. What the buyer adds is labor and care, not a paint brush.
The published specification doubles as an inventory list, which matters when a carton has been in a garage for a month and the packing slip is long gone. Read the table below against the parts on the floor before starting, and read the packaging notes if a carton looks like it was stacked badly in transit.
| Component | Published specification | Where it matters in the build |
|---|---|---|
| Cabinet box | 1/2" birch plywood, natural birch interior | The panel you must keep square before anything else is fitted |
| Face frame | 3/4" x 1-1/2" solid birch | Check the joints sit flush before the cabinet goes on the wall |
| Door | Rubberwood frame, MDF panel, full overlay | The last part to hang, because it is the easiest to damage |
| Hinges | Soft-close, concealed, 6-way adjustable | Adjustment happens after hanging, not during |
| Drawer glides | Soft-close undermount, full extension | Fit on the floor, while the box is still accessible from both sides |
| Drawer box | 5/8" rubberwood, dovetail | Seat it on the glides before the counter goes down |
| Shelves | 3/4" plywood, adjustable; half-depth in base cabinets | Install once the cabinet is level |
| Finish | 7 layers of paint with UV protection | Handle with clean hands and keep the wrapping on until painting is done |
An order of work that holds up
Sort cartons by cabinet, not by part type. A run of six cabinets tipped into one pile of doors, one pile of boxes and one pile of drawer fronts turns a simple build into a matching exercise, because full overlay doors are drilled and finished as a set and swapping them between cabinets shows at the gaps.
Then work in this order for each cabinet: assemble and square the box, fit the glides and drawer boxes while the cabinet is still on the floor, stand it, level it, fix it to the wall, then hang the doors and set the hinges. Shelves and drawer fronts go in last. CasaBuilt lists the flat-packed range as rta cabinets and ships each one flat-packed with its own guide, so the sequence stays the same whether the unit is a narrow 9-inch base or a 42-inch double-drawer base.
Where the order changes is at the joinery between cabinets. Base cabinets are joined before the counter template is taken, and wall cabinets are joined in pairs on the floor before being lifted. A 42-inch wall cabinet is awkward for one person regardless of how strong that person is.
Tools worth having out before the first carton
A cordless drill-driver, a rubber mallet, a try square, a tape measure, a spirit level long enough to span a cabinet, a stud finder, shims, a couple of clamps and a tub for the hardware bags. Add trestles or a folding bench so the box is at working height; assembling on the floor works, but it is unkind to knees and it hides the diagonals you are trying to read.
Two items get forgotten. The first is light: a work light aimed across the face frame shows a flush joint that a shadowed garage hides. The second is a second pair of hands for the wall cabinets, which is cheaper than a repaired door and much cheaper than a dropped one.
Keep the hardware bags with their cabinet until that cabinet is built. Bags from three cartons mixed together look identical and rarely are, and a missing hinge at the end of a run stalls the installation while a replacement ships.
Worked example: three widths, one price band
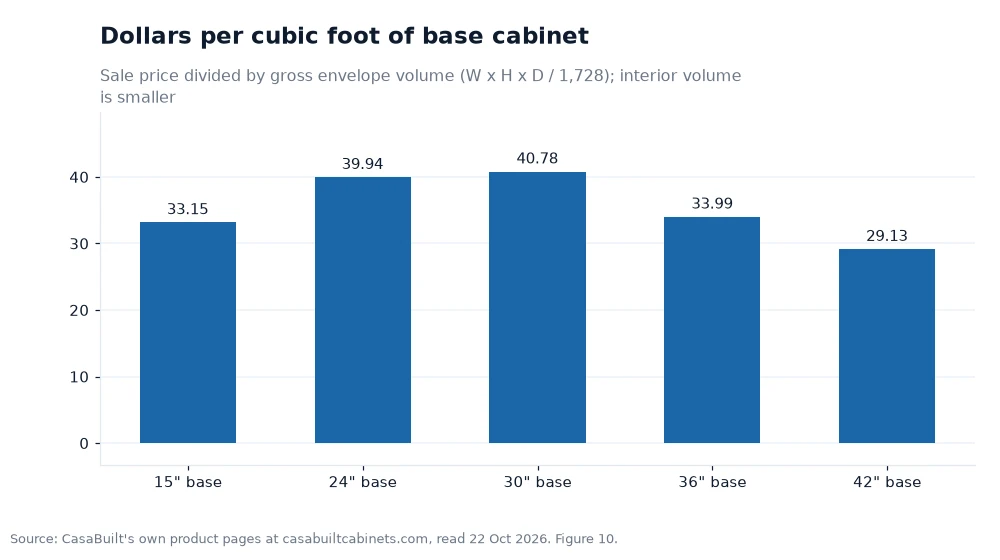
The chart compares five base cabinet widths by dollars per cubic foot. The envelope is width times the published 34-1/2-inch height times the published 24-inch depth, divided by 1,728 to convert cubic inches to cubic feet. The prices come from the published sale list: $238.24 for a 9-21 inch single-door base, $459.26 for a 24-27 inch double-door base, and $586.28 for the 30-42 inch double-door base.
Start with the 15-inch cabinet. Its envelope is 15 x 34.5 x 24 = 12,420 cubic inches, which is 7.1875 cubic feet. Divide $238.24 by 7.1875 and the answer is $33.15 per cubic foot, the first bar on the chart. The 24-inch cabinet is 24 x 34.5 x 24 = 19,872 cubic inches, or 11.5 cubic feet; $459.26 divided by 11.5 gives $39.94. The 30-inch cabinet is 14.375 cubic feet, and $586.28 divided by 14.375 gives $40.78.
The last two bars use the same $586.28. At 36 inches the envelope is 29,808 cubic inches, or 17.25 cubic feet, so the rate falls to $33.99. At 42 inches it is 34,776 cubic inches, or 20.125 cubic feet, which gives $29.13, the lowest on the chart. The 42-inch cabinet costs 2.46 times what the 15-inch costs, but it carries 2.8 times the envelope volume.
Frequently asked questions
Do the doors arrive already fitted?
No. The doors and hinges travel in the carton and are hung after the cabinet is fixed and level. Hanging a door while the cabinet is still on the floor means hanging it twice, and the second attempt is where screw holes start to strip.
What should I do if a part is missing or damaged?
Stop the build and contact support before drilling anything further. The published warranty covers manufacturing defects in materials and workmanship for one year under normal residential use, and support provides a replacement part or an appropriate solution. Photograph the part next to the carton label so the replacement matches the cabinet you are building.
Can I assemble cabinets weeks before installation day?
Yes. The parts are finished and flat-packed, and CasaBuilt advises storing them until installation. Keep cartons flat and off a bare concrete floor, and leave doors and drawer fronts wrapped until the room has been painted, because the painted face is the most damage-prone surface in the order.
Build one cabinet, then build the run
Assemble a single cabinet before opening the rest. One build shows you where the guide is thin, which tool you are missing and how much floor space the panels actually need. Then batch the work: all the boxes, all the glides, all the wall fixings, all the doors.
Batching feels slower on the first afternoon and is faster by the end of the run, because the drill, the level and the shim stock stay in your hands instead of being put down and picked up. It also keeps the finished cabinets wrapped and out of the way while the room is still a work site.
Figures quoted here come from the manufacturer's own website, read 22 Oct 2026[1].